
If you get tired of too many orange plastic pumpkin pails in your house or attic – don’t throw them out! Instead, breathe new life into them and make them into a creepy cat (one that is vintage inspired at that!). This idea didn’t just come to me – I actually stumbled on the idea years ago on Pinterest and have been meaning to give it a try myself. I had to buy a pumpkin pail (believe it or not, I did not have an extra one laying around!) to create my cat pail. I snagged one for $1 (which is typically what they cost at the store) at the flea market weeks ago. At one point, I did have lots of pumpkin head pails because I always pot mums in them and set them around the front porch this time of year, however I am a lazy gardener and housekeeper and they got busted and faded by the elements just chilling out in my backyard. I’ve learned my lesson from that – respect your pumpkin pails, and in return they’ll respect you and your creativity.
Keep reading to learn how you can make your Halloween cat pail from a pumpkin:

First step is simple – paint it black (just like the Rolling Stones want to do to every red door they see…). I used a matte black spray paint, just because I prefer the matte color and the acrylic paints I chose were also matte and it made the textures more uniform on this project.

Spray your pail all around the outside and let dry completely (I waited several days before painting the details after I spray painted it so that I knew it was dry and also because life is busy).

Select some acrylic paints for the theme you want on your cat. I wanted a bit of a vintage, warm look and feel so I picked-up some warmer hues – but I think you’ll definitely want white for the outline of your details and for it’s teeth. I bought my paints at Walmart because they all cost less than $1 (and because I’m all about DIY’s on the cheap side!).

There’s no real right or wrong way to paint your cat’s face once you’ve got your black base on (heck, you could make a purple, green or grey cat if you wanted! As Bob Ross would recommend, just go crazy!). I started with the mouth area first. I used the pumpkin’s original mouth placement as a guide, but added more of a rounded effect at the corners.

As you can see about I just added the other features in no particular order. Please feel free to use this as a guide to inspire your own cat creation! Note, you will need to use several coats on these basic features for them to really pop.

I added some small detail around the eyes which gives it that vintage feel.

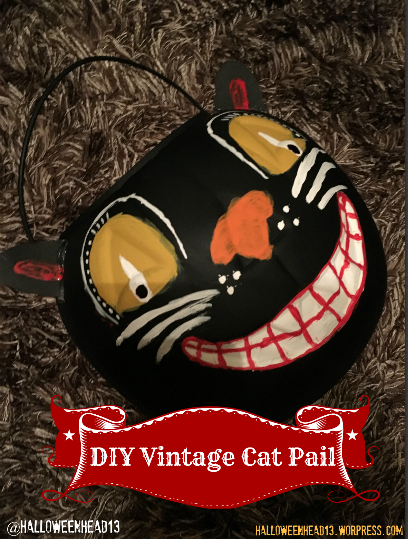
After several coats, I went over my dried areas to add the small details like the lines in my cat’s toothy grin and the white of it’s eyes and his pupils (I originally gave him red pupils, but it looked a wee bit too sinister than I what I desired so I went over that with black nail polish).
I cut the ear shapes out of poster board and spray painted them black and simply hot glued them right atop his head.

There you have it! I hope you’re inspired to reinvent your basic pumpkin pails this Halloween and create something special. You can name your cat, fill him with Halloween goodies, or let him rest on a shelf bringing Halloween cheer to all who gaze in his direction.

GREAT idea – and it came out so nice!
LikeLike